Thursday, March 31, 2011

Family Home Evening Board

A Family Home Evening Board is something that you may find in a Mormon home. We do something on monday nights called Family Home Evening. Its much like a family game night. We use monday night to teach our kids about religion, prayer and we play together. 
I got this metal board at the wood connection, but I was even thinking you could use a cookie sheet. I cut out my vinyl letters on a cricut.

I made a card for each member of my family and I have a few extra for the members to come. They are laminated so if we have visitors we can write them into the rotation with a dry erase marker.


Each week we take turns doing the activities of Family Home Evening.

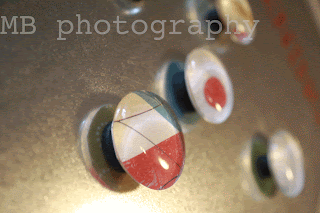
The magnets I made and a tutorial can be found here. At the wood connection they used gemstones hot glued to magnets. I also made one for my Mom and Mother-in-law, I made theirs a little different I put grandkids in vinyl letters. They use the board to showcase their grandkids! 

Wednesday, March 30, 2011

Clear Rock Magnets

These are one of my favorite things to make. One of my roommates made them for me about 5 years ago and I love them. They are super easy to make.
You will need:
Clear craft rocks ( I got mine at Robert's, but you can get them at any craft store or dollar store)
Scrapbook paper,
Magnets, 
Sponge paint brush, 
Modge Podge (elmers glue or any glue that dries clear will also work),
and hot glue.  


All you do is:
1- Paint flat side of the rocks with modge podge and place them on your paper.
2- Cut around the rocks.
3- Hot glue the Magnet to the back.
You could use any paper to match our decor or make magnet letters for your kids to play with the possibilites are endless!


Friday, March 25, 2011

Blog Swap with A Vision to Remember

We are super excited to be swapping blogs with this super creative gal. You can go over to her blog to see our swap too!!


I am so excited to be here today! I am the author of A Vision to Remember. I also have my own etsy shop, where I sell many of my creations. I am a stay at home mom of 2 awesome girls and one dog. They are my inspiration for sure. Everything that I have made has been for them in some way.

Here are a couple of things that I have made over at my blog:

I love making rag quilts. I sell many in my etsy shop, but this pattern is available for download on my blog here.


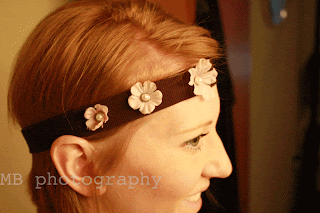
This was a fun pleated headband that I made for myself (one of the few times that I craft for myself, if you know what I mean :)


I also made this fun Ribbon skirt for my daughter (Part 1, Part 2)

I also have many other tutorials on my blog. Make sure to stop by and check them out.


I also have my own Etsy shop. There I sell rag quilts, car seat tents, and lots of patterns. Some of the patterns I sell are rag quilts, belly band, and fabric flowers.


Thanks again for swapping blogs with me and make sure to stop by tomorrow and link up to Check ME Out Saturday Link Party Have a great day!

fun easy headband

This headband is super easy and fun, and I had most of the stuff so depending on your craft stash it could be free. 

You will need a headband any kind you prefer, flowers (I used some that were different sizes), gemstone brads and hot glue.
all you do is...
1. Separate your flowers so you only have one layer.
2. Put the gemstone brad through the hole in the flower.
3. Hot glue it to your headband. You can glue it anyway you want I did mine big to small.   


Its one of the only headbands my little girl wears!


Thursday, March 24, 2011

Lentil Soup with Quinoa

I spent some time in Peru and while there they had this amazing thing called quinoa, when I came home I discovered that it was a huge health craze. Well I have been wanting to cook something with quinoa for a while so I looked up some recipes and there is so much you can do with this little grain.    
I had some Lentils in my cupboard so I decided to try this Lentil Soup with Quinoa that I found here. You will need about an hour to cook it but most of the time is in cooking the lentils.
Here is the Recipe...

Recipe: Lentil Soup with Quinoa

Ingredients

  • 2 cups green lentils (dried)
  • 1 cup quinoa, soaked for 15 minutes and rinsed
  • 12 cups vegetable broth
  • 2 onions, chopped
  • 4 carrots, chopped
  • 1 cup celery, sliced thin
  • 10 cloves garlic, minced
  • ½ cup tomato sauce
  • 2 T olive oil
  • 1 T dried oregano
  • Mineral sea salt and fresh cracked black pepper
  • Juice of two lemons

Instructions

  1. Place lentils and broth in a large pot and bring to a boil. Reduce the heat to medium low and simmer for 30 minutes.
  2. Add in quinoa, onions, carrots, celery, garlic, tomato sauce, olive oil, oregano, salt and pepper. Cook for another 30 minutes or until lentils are tender.    Stir in lemon juice just before serving.
  3. If desired, this soup can be frozen for up to three months. Allow to cool first!


The veggies look so yummy! This was so easy you just cook the lentils for 30 minutes then add everything else.

into your pot and simmer for another 30 minutes. Make sure you are stirring quite often because the lentils burn to the bottom really easily.   

It turned out really good and the quinoa are really interesting the go clear in the middle and white on the edges and really don't have much flavor but a good source of protein.

Wednesday, March 23, 2011

New Shoes!!

My husband and I were in the store the other day and found these bad boys for three dollars!! 

When we got home with them I had to go back to the store to get a second pair. I came across this from Make it and Love it, and thought it was a great idea. She modge podged fabric to similar shoes. I loved the idea, it made them look designer. 


Because it was such a great idea I had to do it. I picked out some fabric that I thought would match the cloths that I wear, I also had to consider that the fabric should get noticed (so I could tell people that they are original).
I chose these patterns.


They turned out Great.

How To: 
1. Cut fabric just bigger than the shoe.
 2. Trim around the edges.
3. Cut a slit in the back of the fabric to the top of the shoe.
4. Apply Mod Podge to the toe of the shoe.
5. Put the fabric on the glue and stretch it so it lays flat on the shoe.
6. Continue all the way around the shoe, and pull the fabric tight as you smooth it down.
7. Trim the fabric along the sole and inside of the shoe, leaving about a 1/2 inch of fabric. Glue down the sides.
8. Cut the fabric on the sole of the shoe using a knife/razor blade.
 
Secret: Don't cover the whole thing in modge podge it makes it super stiff and uncomfortable. I recommend just using the glue under the fabric and around the sole of the shoe


Tuesday, March 22, 2011

Crochet headband

I've wanted to make a headband that actually stays in my hair without sliding back on my head for a long time now. I found this blog post on You Seriously Made That. I though it was the cutest thing ever. I had yarn and ribbon so I thought I give it a try.

It turned out great! I love the color, I just happened to have this color of yarn, and I loved how easy it was to make.
Crochet two strands of chains on chain of 160 and another of 300.
Fold each strand of chains in thirds and tie in the knot that is found on the link above (It was too hard for me to take pictures of each step, sorry).

The knot should look something like this. Of course I always like to throw in my own ideas so try tying the knot a different way and see how that turns out. You can always untie it and try again. Once you have created the knot of your choice hot glue the ends of the chains together and add ribbon to keep them from separating as well and tying the headband around your hair.
I have absolutely no sense of fashion so I was found wearing this orange headband, a maroon shirt, pink jacket and loved every second of it! The great thing is I didn't pay anything for it, because I had the materials already!


Sunday, March 20, 2011

My 30 for 30 buddy

Someone has decided to do the 30 for 30 and that someone is this guy.... 
Yep my hubby and I will be fashion buddies for 30 days!!
So here are his picks...

Shoes: 
1. black Nordstrom Rack,
2. gray Nordstrom Rack. 

 Jackets:
3. dark gray Fred Meyer,
4. light gray Eddie Bauer,
5. black REI.
Pants: L-R
6. jeans Wal-mart,
7. green Eddie Bauer,
8. jeans Aeropostale,
9. green Walmart,
10. brown Walmart,
11. khaki JC Penny,
12. black Eddie Bauer
13. khaki JC Penny.

Button-ups:
14. cream Burlington,
15. blue H&M,
16. pink H&M,
17. White H&M.

Pullovers:
18. Gray Eddie Bauer,
19. Red Eddie Bauer.

 Polos:
20. cream Eddie Bauer,
21. salmon Wal-mart,
22. orange Van Heusen.  
Long Sleeves:
23. dark blue Old Navy,
24. light blue Wal-mart,
25. white Old Navy.

Suits:
26. & 27. Stripes Mens Wearhouse,
28. white Macys
29. & 30. gray Mens Wearhouse.
Well thats his 30 items, he has to wear his uniform to work everyday but he changes when he gets home everyday so the outfits wont be warn all day but he will create 30 different outfits over the next 30 days! Thanks Husband for doing this with me!!


Princess Sign

My little girls room is Purple and Yellow so I made this sign to go in her room. First I got the wood and painted two coats of purple. I then sanded the edges. I cut the letter out of vinyl on the cricket, I cut white out first then I cut purple one size smaller than the white. Using the contact paper I put the white letters on the board so that they would be evenly spaced then I put the purple letter on top one by one.   

The letters and the crown come from the alphalicious cartridge